Friday, June 5, 2015

Algebra 2 Unit 5 Part 2

This is where I wish I would have separated Chapter 5 into it's second part about Radicals & Rational Exponents. I see why our text book has them in the same chapter but it was just too long and to much too many ideas to be assessed on at once.


First I introduced the parts of a radical, how to simplify them and what the prime numbers are you can break the composite numbers into. I got all of these things from Sarah at Math Equals love here.


The next thing we did was multiplying, adding and subtracting radicals. I believe we did these on a block day where we first took the notes on multiplying and did some practice with that and then came back to our notes for adding/subtracting and then their homework was just on add/subtract. These graphic organizers are also at the link above.


Dividing radicals notes are pretty boring with a few examples. Rationalizing the denominator was a little challenging for them.


Rational exponents are something the students are not a big fan of just because they see fractions and get scared. I got this graphic organizer from Math Equals Love here. The day we took these notes I had a warmup assignment where we practiced operations with fractions in preparation for these.


Solving rational equations came up next and we wrote down some steps but it was still pretty challenging for my Algebra 2 students. With the inequalities they often forgot to see if the answer gave a real expression.


Lastly for this unit is complex numbers. They were a nice thing to end with since the next unit is on quadratic equations. Again some fairly boring notes with nothing glued in. Overall my students did pretty well with imaginary numbers except rationalizing the denominator still kinda got them.


So I wish this was all my students were assessed on for this unit but it also included all the polynomial add/subtract/multiply/divide and factor problems as well. It was just too topics for them to be held responsible for at once. Next year I will fix that.

Algebra 2 Unit 5 Part 1

So after systems our book has us skip matrices until the end of second semester so our units go from 3 to 5. Chapter 5 in our book is titled Polynomials and is extremely long. I really wish I would have broken it up into 2 units and that's how I am going to share it here. Polynomials are all in BLUE! :)


We start of by reviewing exponent rules and monomials. This foldable I found on TPT here. Apparently this class did not get a chance for us to fill in the door about scientific notation.


Then we moves on to polynomials. We learned how to identify and name them and then how to add and subtract them. I got the graphic organizer form Math Equals Love here.

We then moved onto multiplying polynomials and I love having my students use box method. Some students try to fight it and FOIL but I hate that. I call it "double distribute" if we do use it. I made this example page just using word. I don't know how to upload my files yet so if I figure it out I will add it in.  For practice I used my sheet protectors I blogged about for distance and midpoint here. The papers I slid in have the boxes already there so they can just practice with whiteboard markers.


Then we moved onto dividing polynomials. We learned both long division and synthetic division. We glued in these steps I got from Math Equals Love but I couldn't find the page where I got them, I'll look again. I also have synthetic division bar paper I put into a sheet protector and have the students practice that way. Like I said before students love writing with dry erase markers and are more willing to make mistakes I fell because it's not permanent.


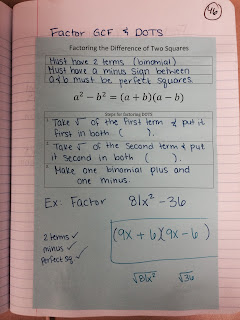
The first thing I had my students start factoring was GCF and DOTS. I think my students this year were the best I've had at factoring out the greatest common factor. I try to teach it to them as "undistributing." For Difference of Two Squares I used a graphic organizer from Math Equals Love here but made it my own and tweaked it a little.


We then moved onto factoring trinomials. This is the first year I taught it as the "X Box" method. I always have used the x method but this year we added in the box. It's not anything new and lots of teachers use it but I just made the examples page in word and put the x and box there for them. When we did rational expressions second semester they seemed to remember factoring trinomials pretty well.


Next was factoring cubes and I also just tweaked a graphic organizer from Math Equals Love at the same link above. Again I have a factor by grouping scaffolding that I have the students use to practice problems in the sheet protectors as white board problems. My students did really well with those as long as they didn't have to rearrange them first.


Lastly I had my students glue in this factoring flow chart I found here and take a couple of notes as a to which method to use based on the number of terms. This comes in handy once all the factoring questions are all mixed together.


This is where I wish I would have stopped the unit and tested but unfortunately I went with the book and kept the chapter going. Next year will be better though and I will break Ch 5 into two units. So the next post will be the notes on Radicals and Rational Exponents.


Thursday, June 4, 2015

Algebra 2 Unit 3

Our third unit in Algebra 2 is on Systems of Equations & Inequalities(yellow!). I really like systems and we started off the unit with a worksheet of system word problems. My students hadn't learned how to solve them or set them up or anything but I gave them 8 word problems and put them in pairs to try to figure them out. There was a lot of guess and check going on and some pairs did try to set up some equations. It was a good experience for them to see why we have systems before we even used them.


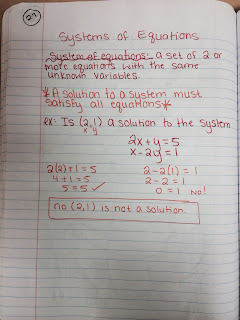
The next day we took our first set of notes (well technically started two sets). Our first set of notes were these two pages but we only filled in the foldable for graphing. I found this one on TPT here.


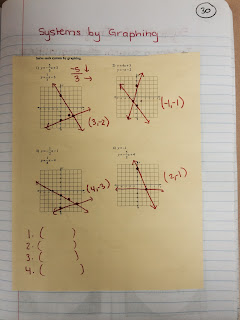
That same day we started the other set of notes we also took these ones. We did our notes on the right together and then I had my students do the 4 problems on the left on their own. We just finished the unit on graphing linear equations so they just needed to graph both lines and see the point of intersection. These are really just four problems I made using Kuta Software. You have to have a license to make your own but they have lots of free ones on their website here.


Instead of moving on to Elimination & Substitution like the book I went ahead and did systems of inequalities because its similar to solving by graphing. This foldable can be found on TPT here and I had it printed on white so we could use colored pencils to shade. I think it helps the students if you have them graph and shade each inequality in a different color so you can more easily see where they overlap.


We then moved to solving systems by substitution and elimination. We have block days at my school so we started off by filling in the substitution door on the foldable a few pages back and then the top of this foldable found here on Teaching Statistic's blog. We did some practice problems on white boards until they go the hang of it. My students love whiteboards, they show more work and aren't as worried about mistakes since with the swipe of a finger they're gone. Then we came back together to learn about elimination (my and most of their favorite). Filled in the other foldable and the bottom of the one on this page. Then their homework for the night was just on elimination. The next day we did the same word problem worksheet we did before we learned anything about systems so that now they could actually solve them with math. I also had them glue in the graphic organizer below. I used it in years past but couldn't find it anywhere in my files and had to purchase it here on TPT. I love how it organizes everything for them!


Our very last set of notes were the scary systems of three equations with three unknowns. Nothing glued in here, just some steps and two examples. They only had 4 homework problems since they take so long and the next day they were in groups working on task cards with  systems of 3 equations word problems. (I had an observation that day and my administrator really liked the graphic organizer that I had to go along with systems)


That's it for unit 3! After this the unit numbers get outta whack since the unit number matches the chapter number and our scope and sequence has us go all over the book. Only 9 more units to post about! :)

Wednesday, June 3, 2015

Algebra 2 Unit 2

Our second unit in Algebra 2 is on Linear Relations & Functions. This unit is my green unit so everything I copied was in green except for a mistake white foldable : (


Our first set of notes was just an into to functions and relations. I got these graphic organizers here. We did a cut and paste activity where they had to identify the difference between functions and not functions. Then we used this awesome domain foldable. I don't think I referred back to it often enough for students to use it. These notes definitely took longer than I had intended.


Next these notes were pretty boring about linear equations. Students first practiced graphing intercepts to form lines.


These notes are about slope and slope formula. Since slope should be a review for Algebra 2 students we combined Parallel & perpendicular slopes as well. I stole the name idea from Sarah at Math Equals Love and had students identify the slopes when writing their name in straight line letters. She has a bunch of great slope pictures here.


We finally then moved onto Slope-Intercept Form. Students always remember y = mx = b but don't know how to use it or what the letters stand for. I love this foldable I found on TPT here. It has a place to model one problem for the students and then have them try one similar. It also organizes the different information a problem might give them into three doors.


Piecewise Functions were a really difficult topic for my students. When we did problems for warmups or classwork I gave them colored pencils to shade in the the area for each piece and then draw the line in the matching color. One difficulty they also had was deciding the closed or open circle where the functions met.
I got this foldable on TPT here but really am not in love with it (I had to write on the outside of the doors myself and the title on top was hard to cut around) I may remake something next time.


Here is the foldable that should have been printed on green, but at least its white and not yellow or pink. I got it from Sarah here. I like that we started with the parent function so they could see the shape and graphed points to move them around.


Lastly in this unit was Linear Inequalities. I really enjoy these and I should have made something to glue in for the chart to decide solid/dashed and above/below. I've used this little chart for a couple of years though and I think it helps.The foldable came from TPT here. I Like that 2 examples are in slope intercept form and two are not so they have to rewrite them and not rely on the sign. I also like that they circle solid/dashed and above/below before they start.


That's it for unit 2 on Linear Equations & Inequalities.